Friday, March 26, 2010

Taste: Crispy Chicken with Mustard-Mushroom Sauce

I've been trying to figure out a good chicken dish for the longest time that you can still keep somewhat healthy. I'm all for skinless chicken breast, but sometimes, I just want some skin on my chicken! I saw a different take on this dish from my boy Jacques Pepin where he did a whole roasted chicken with a mustard crust, which I am determined to make one of these days (I need to buy some good kitchen shears, first). However, I decided to do chicken thighs with the skin on and a mustard-mushroom sauce on top. Pairing it with T&J's mashed potatoes from our good friend Tyler Florence was perfection. The nice thing about using the chicken thighs with the skin on is that you don't need any oil and it's probably one of the most simple chicken dishes you can possibly make. And I'm all about trying to keep it simple...


Crispy Chicken with Mustard-Mushroom Sauce

Prep Time: 5 mins.
Cook Time: 25 mins.
Serves: 2


4 chicken thighs with skin
1/2 lb. baby bella mushrooms
1/2 cup white onion, diced
1 tbsp dijon mustard
1 tbsp chopped chives
1 cup dry white wine
salt and pepper


Preheat the oven to 170 degrees and heat a non-stick skillet over med-high heat. While heating, wash the chicken thighs and trim of any excess fat. Also, take a sharp knife and cut into the chicken along both sides of the bone. What this will do is eliminate that look of dark red, uncooked chicken meat near the bone. Pat dry and season generously with salt and pepper on both sides. Start cooking the chicken skin side down and cover. The great thing about this dish is that you will cook the chicken the entire time skin side down, but you need to have a cover for the skillet. Cook for approximately 15 minutes or until the skin has a nice golden crust.

In the meantime, clean the baby bella mushrooms and then quarter them and also dice up the onion. Once the chicken is done, remove from the skillet and place the chicken in a oven-safe bowl and place in the oven to keep warm. Keeping about 1/3 of the oil from the chicken in the pan, saute the onions and mushrooms. Pour in the white wine to deglaze and whisk in the dijon mustard. Let the sauce reduce and thicken slightly. Remove the chicken from the oven and plate. Pour in any excess juices from the chicken on the plate back into the mustard-mushroom sauce. Pour the mustard-mushroom sauce over the chicken and top with chopped chives.

Friday, March 19, 2010

Listen: Bonobo and his Black Sands Album

I don't know if it's because it's Friday or because today's just been a great day at work or because Coachella is coming up or because I'm going to Joshua Tree tomorrow, but I was turned on to Bonobo while listening to some old SXSW music. His album, Black Sands, is RIDICULOUS and you just can't help but want to cruise or stroll down the city street listening to his music.

Friday, February 26, 2010

Taste: Stuffed Poblano Peppers with Roasted Red Pepper Sauce

Stuffing anything and covering it with cheese is not only easy but it's always GOOD. After going to the Grand Central Market in Downtown LA, which by the way is a must for any Foodzie out there, we found ourselves some fresh, big poblano peppers perfect for stuffing. You can really let your imagination go wild with stuffing ingredients, but we stuck to what we already had in the pantry and fridge: some rice, beans, cheese and onions. Covering the poblanos with cheese and topping it with the homemade roasted red pepper sauce was awesome.

FYI, this recipe was taken from Jenny's blog, Butter My Jammy, and since she wrote it up I will give her all the credit. As for the Roasted Red Pepper Sauce, you will find the recipe for that below. Enjoy!


Stuffed Poblano Peppers with Roasted Red Pepper Sauce

Prep Time: 10 mins.
Cook Time: 20 mins.
Serves: 3


*Excerpted from J. Ahn (www.buttermyjammy.blogspot.com)

4 large poblano peppers
1/4 lb. cooked chicken, chopped (seasoned with salt & pepper, cumin and chili powder)
1 can of black beans, rinsed
1/2 an onion, diced
few cloves of garlic, minced
cilantro, chopped
Mexican blend cheese (cojita if you've got some)
S&P
extra virgin olive oil
fresh lime juice

Directions:

1) heat oven to 400 degrees. Combine EVOO, beans and garlic in a pot and begin to cook down on low heat. The beans should start to cook down a bit getting soft, feel free to mash it up a bit with a fork. Add in chicken, onions and cilantro and heat through for a few more minutes. Set aside
2) To prepare the peppers for stuffing, cut a cross down the belly of the pepper. Empty out seeds with your hands and give the peppers a rinse. Keep the stems on for presentation :)
3) Stuff the peppers with a small spoon with the bean/chicken mixture. Place in a casserole dish or on a cookie sheet lined with foil and bake for about 40 minutes. During the last 5-10 minutes of baking, top peppers with cheese.


Roasted Red Pepper Sauce

3 red peppers
1/2 white onion, diced
1 jalapeno
2 tbsp honey
salt and pepper
olive oil

Roast the red peppers and jalapeno until the outside is charred. Place in a plastic bag, seal and let sit for 5-10 minutes. Once cooled, peel the outside of the red peppers, cut in half and remove the seeds. Place the roasted red peppers, jalapeno, diced onion into the food processor and blend. While blending, add the honey, and olive oil to emulsify. Season with salt and pepper to taste.

Spoon the sauce over the poblanos and serve with Mexican rice. Enjoy with a glass of Spanish Rioja or, you guessed it, a glass of Guinness!

Wednesday, February 24, 2010

Taste: NY Strip Steak with Red Pepper Sauce and Mustard Greens

Ever since I got my food processor, I've been wanting to make sauces. This may be the only reason why I bought the food processor to begin with. Actually, no it's not. Anyways, I recently saw Bobby Flay make a red pepper sauce on one of his shows, so, I thought why not pair a spicy, red pepper sauce with a good steak as an alternative to the typical steak sauce and horseradish blend. I've also been a big advocate these days of keeping things simple when it comes to meat, so rather than doing my typical garlic crusted steak with steak seasoning, I went with liberal amounts of salt and pepper. Lastly, instead of grilling the steaks, I went with a less healthier, but certainly tastier cooking method - the good old cast iron skillet with some butter.


NY Strip Steak with Red Pepper Sauce and Mustard Greens

Prep Time: 10 mins.
Cook Time: 20 mins.
Serves: 3


3, 1/2 lb. NY Strip Steak
1/2 lb. mustard greens
3 tbsp butter
1 tbsp garlic, minced
2 tbsp shallot, minced
2 tbsp olive oil
salt and pepper


Bring the steaks to room temperature. Brush the steaks with the olive oil and season generously with salt and fresh cracked pepper. Heat the cast iron skillet over medium-high heat. Once hot, place the steaks on the cast iron skillet. You definitely want to hear that roaring sizzle the second you place the steaks on the skillet. Cook for 4-5 minutes until blackened and then turn over and cook for another 4-5 minutes.

For the mustard greens, wash thoroughly and trim the ends. Heat a skillet and add 2 tbsp of olive oil. Once hot, add the shallots and garlic and cook for 1 minute. Add the mustard greens and saute until cooked down. Season with salt and pepper.

For the last minute before the steaks are done, add the butter. While cooking, baste the steaks with the melted butter. When the steaks are done, let rest for 5 minutes.

Roasted Red Pepper Sauce

3 red peppers
1/2 white onion, diced
1 jalapeno
2 tbsp honey
salt and pepper
olive oil

Roast the red peppers and jalapeno until the outside is charred. Place in a plastic bag, seal and let sit for 5-10 minutes. Once cooled, peel the outside of the red peppers, cut in half and remove the seeds. Place the roasted red peppers, jalapeno, diced onion into the food processor and blend. While blending, add the honey, and olive oil to emulsify. Season with salt and pepper to taste.

Spoon the sauce onto the plate and place the steaks on top. Enjoy with a glass of red wine or Guinness!


Tuesday, February 23, 2010

Taste: Homemade Cornmeal Pizzas 2 Ways: Bacon, Leeks & Goat Cheese and Roasted Tomatoes, Asparagus & Mushroom

Who doesn't love a good pizza party? I stumbled upon making homemade pizzas a healthy way by using cornmeal pizza crust quite sometime ago, but more recently, I've come to realize what makes a fantastic pizza are the toppings and sauce. You can get them at Whole Foods, but I haven't seen them elsewhere, which is a bit disappointing. Fortunately, Jenny's creative mind introduced me to a restaurant worthy pizza by adding sauteed bacon, leeks and roasted goat cheese with NO SAUCE. I know. Crazy. But let me tell you; try this recipe and you'll go sans sauce the next time you try to make a pizza. The other pizza made was a vegetarian pizza with roasted tomatoes, asparagus and mushrooms. Try this the next time it's movie night and your bound to enjoy your movie a little more and have some great sleep. :)


Cornmeal Pizzas with Bacon, Leeks and Goat Cheese

Prep Time: 15 Mins.
Cook Time: 25 mins.
Serves: 4@


4 strips thick cut bacon
1 bunch leeks, cleaned
4 tbsp goat cheese
2 tbsp fresh mozzarella cheese
1 cornmeal crust pizza
2 tsp olive oil
salt and pepper


Cornmeal Pizzas with Roasted Tomatoes, Asparagus and Mushrooms

Prep Time: 15 Mins.
Cook Time: 25 mins.
Serves: 2


3 Roma tomatoes
5 stalks asparagus
1/2 oz. baby Bella mushrooms, cleaned
2 tbsp fresh mozzarella cheese
1 cornmeal crust pizza
2 tbsp pizza sauce
2 tsp olive oil
2 tsp fresh thyme
salt and pepper

Preheat the oven to 425 degrees. For the bacon, leek and goat cheese pizza, start by brushing the pizza crust with the olive oil. Saute the chopped bacon, and then set aside by draining on paper towels, being sure to leave the bacon fat. Saute the choppped leeks in the bacon fat, and once done, add the bacon back in. Spread the cooked bacon and leek mixture, top with the fresh mozzarella and goat cheese and crack some fresh black pepper on top.

For the roasted tomato, asparagus and mushroom pizza, start by boiling water and blanch the asparagus. After about 5 minutes, drain the asparagus and rinse under cold water to stop the cooking process. Half the asparagus. Start sauteing the chopped mushrooms in olive oil and then add asparagus. Meanwhile, slice the Roma tomatoes. After 5 minutes of sauteing the mushrooms and asparagus, brush the cornmeal crust with the pizza sauce, add the mushroom and asparagus mixture, top with the slice Roma tomatoes, fresh thyme and mozzarella cheese.

Bake in the oven for 25 minutes or until the cheese is slightly browned and bubbling. Serve with a heavy red wine and start the party!

Wednesday, February 17, 2010

Tinker: LA Gun Club

So my friend Pete's been dying to go to a shooting range for the past few months. Having grown up in the cuts of Western Pennsylvania, I shot my first gun at the age of 13, a 12-Gauge, so it's been a long time since holding a any kind of firearm. Yeah, I guess you can consider me an Asian-hick-American, but hey I take pride in my upbringing. Anyways, after a great lamb, double dip, french dip sandwich at Philippe's French Dip we decided to head to the LA Gun Club just a stone's throw away from Philippe's. By the way, this place seemingly had a ratio of 1:2 (guys to girls), at least. So the next time all you guys are trying mingle, forget the bars, coffee shops and bookstores...head to a shooting range.

Enjoy the show and, yes, laugh all you want. Say hello to the Raging Bull!

Monday, February 15, 2010

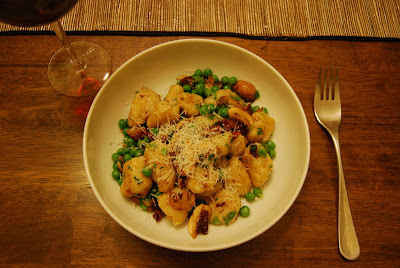
Taste: Potato and Parmesan Gnocchi with Bacon, Mushrooms and Peas

So I've always been a little intimidated when it comes to making homemade pastas and dough. I'd like to blame it on the fact that I never had a food processor, but then again, that's a really poor excuse because not all pastas and doughs require it! Through bargain hunting and a handy gift card, I was able to get a great Cuisinart 7-Cup Food Processor for about 70% off the retail price. Eager to try it out, I decided to take the leap and try to make homemade gnocchi. With the food processor, it was rather simple. Kneading the dough was fun and it's somewhat empowering, if that makes any sense. The great thing about gnocchi is that you can also freeze whatever you don't use for a later date which is great.

This meal is a really simple one and easy to make. You can certainly use the pre-made gnocchi from your local market if you don't want to invest the time; the meal will come out just as good (in half the time). Though I used bacon, you can take it to a healthier level by using turkey bacon, or even omitting the meat in all. Just be sure you add a few of your favorites spices to keep it delectable. Nonetheless, your first bite will result in a raging party in your mouth and you'll have a great gnocchi dish to make anytime for anyone - quickly.


Potato and Parmesan Gnocchi with Bacon, Mushrooms and Peas

Prep Time: 80 Mins.
Cook Time: 15 mins.
Serves: 2


2 lbs. russet potatoes
2 cups flour
1/4 cup grated Parmesan cheese
1 egg
2 cups frozen green peas, thawed
4 strips of thick cut bacon
1 cup chopped baby bella mushrooms

Preheat the oven to 400 degrees. Baked the potatoes for approximately 40 minutes under fork tender. Take out and let cool to where you can handle them. Once cooled, peel the potatoes and then grate the potatoes or put them through a ricer. In a food processor, add the grated potatoes and 1 egg, slightly beaten. Begin adding the flour to the mixture, pulsing to incorporate thoroughly. Continue adding the flour a little at a time until the dough can be easily handled without it sticking to your hands. Roll the dough into a ball and get your working surface ready for kneading by flouring it generously. Cut the dough into 6 little pieces and form them into balls. Next, start rolling one of the dough balls into a rope, about 1 inch in diameter. Cut the rope into 1 in pieces and then roll the cut end over with your finger, pressing down to seal the end. You'll then want to take a tines of the fork to put indentations in the gnocchi. Repeat until you make all the gnocchi.

If using store bought Gnocchi, start here!

Start to bring a pot of salted water to a boil. When the pot comes to a boil, add the gnocchi. You will know when the gnocchi is done because they will float to the top (this applies to store bought gnocchi.) In the meantime, heat a skillet on medium-high. Cut the bacon into small strips and start browning the bacon. Set aside on a plate, leaving the bacon fat. Using the same pan, saute the mushrooms and adding the bacon back once the mushrooms have cooked. By this point the gnocchi should be done, so simply drain and add the gnocchi right into the bacon and mushrooms, even adding some of the water used to boil the gnocchi. Doing this will help create a thick, tasty sauce. Once the gnocchi has slightly browned, add the peas at the end, give it a quick toss and serve immediately. I took some of the leftover Parmesan and gave it a few shavings on top because freshly grated cheese always makes everything taste better.

Saturday, February 6, 2010

Taste: Classic Cheeseburger with Fried Egg

I got this really awesome coffee table book for Christmas called My Last Supper: 50 Great Chefs and Their Final Meals. As a foodie and one that appreciates great coffee table books, it was such a perfect and very thoughtful gift (thanks BMJ!). The book asks 50 of the some of the world's most renowned chefs 5 questions, such as what their last meal would be if there was no tomorrow and who would cook it. The latter part of the book contains a single recipe from each chef, one that they'd make for the last time, which I find myself reading through a few times a week because it's just so damn entertaining and inspiring.

One of my favorite chefs is Wylie Dufresne of wd~50 in New York City. In the book, he talks about keeping a burger simple, yet classic, by adding a fried egg. I've always wanted to try this and on a rainy, Friday evening with a 12 pack of Guinness in the fridge, I whipped out the cast iron skillet and recreated it. I'm a bit of a health nut, but moving forward, when I have a burger, there's certainly going to be cheese and a fried egg on top. Oh, and a glass of Guinness or two.


Classic Cheeseburger with Fried Egg on Brioche Bun

Prep Time: 5 Mins.
Cook Time: 8-10 mins.
Serves: 3


1 lb. ground chuck (85/15)
3 eggs
3 slices American cheese
salt and pepper
3 Brioche buns

Start by forming 3 burgers, loosely. Handling the meat as little as possible will keep the burgers tender. Season generously on both sides with kosher salt and fresh cracked pepper.

Heat the cast iron skillet on med-high. Once the skillet is hot, place the burgers in the skillet and cook for 3-4 minutes. Flip, place a slice of American cheese on top of each and cook for another 3-4 minutes for medium to medium-rare.

In the meantime, start frying the eggs, sunny-side up. Once the burgers are done, place on slightly toasted Brioche buns and top with the fried egg.

Friday, February 5, 2010

Listen: Two Door Cinema Club Preview

I've been listening to a promo album these days by the group Two Door Cinema Club. I first heard them on KCRW's Morning Becomes Eclectic and ever since, I've been hooked. I was able to cop the promo album yesterday, and it's been on rotation in my car and at the office since. The album is due out in March sometime, I believe, and when it's released, I highly recommend it. Fortunately, people in Los Angeles drive 35 mph tops on the freeways when it rains, so I had the joy of hearing a few extra tracks in the car to start my day. What's up Mr. Weekend!


This is the Life by Two Door Cinema Club

Wednesday, February 3, 2010

Taste: Come get your Greens on!

Sometimes, you have to put your manliness aside and get your greens on - and I mean as a meal. It's the cool thing to do, especially when you're eating alone and no one can witness you losing some of that hair on your chest (well, I'm Asian so I don't have much hair on my chest to begin with...). Since I feel like I've been eating some really good food the past week or two (and "really good food" to me usually means lots of meat or fried food), I felt like my body needed a good dose of vitamins. This is a quick meal that you can make anytime when you're lazy, on a health kick, or just want to eat like a high-class rabbit.


Spinach Salad with Roasted Pecans, Dried Cranberries and Goat Cheese

Prep Time: 15 Mins.
Serves: 1 to 2


1/2 bag of baby spinach
1/4 cup raw pecans
1/4 cup dried cranberries
2 tbsp goat cheese
4 tbsp oil olive
1 tbsp balsamic vinegar
salt and pepper

Start by roasting the pecans in the oven at 350 degrees for 8-10 minutes. While roasting the pecans, prepare the balsamic vinaigrette by combining the olive oil and balsamic vinegar. An easy way to make a vinaigrette rather than whisking is by putting the ingredients in a little jar, put the cap on and give it a shake. Season the dressing with salt and pepper.

Once the pecans are done, let them cool for 5 minutes. Pour the dressing into a large bowl and put in the spinach, cranberries and pecans. Toss to combine and coat with the dressing. Serve in a large bowl, top with crumbles of goat cheese and some fresh cracked pepper.

Sunday, January 31, 2010

Taste: Lemon Pepper Dry-Rubbed BBQ Chicken Wings

Just in time for the Super Bowl, I was introduced to a new way of making some serious, kick-ass grilled chicken wings. My boy, Mr. Hand, wanted to flaunt his grilling skills and I let him go at it. I must say, as a self-proclaimed amateur grillmaster, the wings were top notch, possibly some of the best I've ever had.

He first applied a lemon-pepper dry rub to the wings and let them marinade for about 30 minutes. Once grilled with a nice crust, he basted them on low heat for another 30 minutes. (Seemingly long, it was perfect on the inside, crispy and sticky on the outside). Though he made it with both chicken wings and regular thighs, the wings-style BBQ wings taste the best (less meat, more sauce). We decided to pair this with some of T&J's Mac and Cheese and simple salad to balance it all out. It's time to grill and chill.


Lemon Pepper Dry-Rubbed BBQ Chicken Wings

Prep Time: 30 Mins.
Cooking Time: 30 Mins.
Serves: 4


3 lbs. chicken wings
3 tbsp of lemon-pepper seasoning
1/4 cup honey
3 cups Mr. Stubbs BBQ Sauce

Rinse the wings under cold water and pat dry. *NOTE: You want to make sure that the chicken is very dry before you add anything to it as this will ensure you a crispy outside skin. Place the chicken wings in a large plastic bag and add the lemon-pepper seasoning. Close the bag and shake, getting the wings nicely coated with all the seasoning. Place in the fridge and let it marinade for at least 30 minutes.

In the meantime, prepare the honey-BBQ sauce by heating the 1/4 cup of honey in a microwave for 10-15 seconds. What you're trying to do here is to make the honey easier to mix into the BBQ sauce. Once heated, combine the honey and BBQ sauce and set aside.

Once your chicken has marinated, preheat the grill on high. Once your grill is ready to go, reduce the heat to medium-low and place the wings on the grill, skin side down. Grill for about 3-5 minutes, or until the skin side has a nice crust on it. Flip the wings and baste the wings. You'll repeat the flip and baste process for about 20 more minutes.

Serve the wings hot off the grill with a side of the T&J's Mac and Cheese and salad. And throw in a nicely poured Guinness or glass of your favorite wine.

Wednesday, January 27, 2010

Tinker: The iPad - Apple's newest toy


It's finally been released. And you can get one soon starting at only $499.00. Check it out!

Sunday, January 24, 2010

Tinker: You Play To Win The Game

My boy, Alfredo, forwarded this to me and I had to post it. We've all seen Coors Light commercials during football season with the coaches' post-game interviews...hilarious. I have to admit that football is probably my favorite American sport. As a die hard Steeler fan, I was hoping for a Colts vs. Vikings Super Bowl, but I'll take the Saints to win their 1st ring. In honor of the finale of the NFL season: You Play To Win The Game.

Monday, January 18, 2010

Taste: Roasted Bone-In Chicken with Creamy Mashed Potatoes

Roasted chicken can be one of those meals where you royally **** up and it comes out tasting like cardboard, or even worse, undercooked. But after dozens of times making roasted chicken, I've realized it's really simple to make perfectly cooked and amazingly juicy roasted chicken. It really comes down to cooking time and, in my opinion, the cast iron skillet. Pair this with old school, simple mashed potatoes, and you've got yourself a killer meal with very little effort.

*NOTE: Mashed potatoes are courtesy of my good friend-to-be, Tyler Florence.

Roasted Chicken with Rosemary and Creamy Mashed Potatoes

Prep Time: 60 Mins.
Cooking Time: 35 Mins.
Serves: 2


2 Bone-in chicken breast with skin
3 russet potatoes
1/2 cup heavy cream
1 lemon, halved
1 tbsp chopped rosemary
2 tbsp chopped chives
2 tbsp extra virgin olive oil
1 Bay leaf
2 tbsp butter
salt and pepper

Preheat the oven to 450 degrees. Trim the chicken of any unwanted fat, but leave the skin on. Rinse under cold water and pat dry. *NOTE: You want to make sure that the chicken is very dry before you add anything to it as this will ensure you a crispy outside skin. Drizzle the chicken breasts on both sides with the extra virgin olive oil making sure you rub them to lightly coat them. Generously sprinkle the chicken with the fresh rosemary, juice of 1 lemon, salt and pepper, rubbing them again to get a good coating all over. Set aside and let it marinade for at least 1 hour (optional, however).

Heat a cast iron skillet over medium high heat. I like to drizzle some extra virgin olive oil in the pan and wipe it with a paper towel. A good way to see if the pan is hot enough is to flick some water on it and it should sizzle. Start cooking the chicken breasts by placing them skin side down for approximately 10 minutes. In the end, what you are looking for is a nice, golden brown skin. Turn the chicken over, cook for another 3 minutes, and then place in the oven for 30 minutes or until the it reaches an internal temperature of 160 degrees.

In the meantime, peel and cut the potatoes into 2-inch cubes and place in a pot with water. Salt the water and place the bay leaf in the water. Boil the potatoes until soft and then drain well. Mash the potatoes with the heavy cream and butter. Fold in the chives once mashed and set aside.

Once the chicken is done, take it out of the oven and let it rest for 5 minutes. Plate the chicken with the mashed potatoes and serve with a simple salad and glass of wine...or two.

Friday, January 15, 2010

Tinker: Got Groupons?

Let's face it, the economy has sucked for what seems like an eternity now, and we're always looking for bargains (at least I am). Even if I don't use them, it's still fun to find them and pass them on to your friends. Welcome and embrace: Groupon.

Groupon features 1 deal each day in every city. You can buy the Groupon that day if enough people buy the deal (hence, collective buying power). If enough people buy the Groupon that day, then everyone who wants it, gets it. But if enough people don't buy it, then the Groupon falls through. It's a great way for businesses to get customers through the door, even if they're selling their service or product at such a deep discount because the probably of some customers returning is high. As long as they break even, everyone wins. Check it out - you and your friends are bound to score an awesome deal.

Thursday, January 14, 2010

Listen: La Blogotheque

Peter, a good buddy of mine who seems to always find some serious hidden gems, recently introduced me to La Blogotheque's Take Away Shows (check it out here). One of the coolest sites I've ever visited, I can get lost in here for days. Basically, you find yourself watching these impromptu performances by great indie bands on the streets of Paris. What really strikes me, though, is the unique quality of videos that these are shot in; it truly is a work of art. Some of my favorites bands and performers such as Jose Gonzalez, Phoenix, Grizzly Bear, Arcade Fire and Cold War Kids (recently enlightened by Butter My Jammy) totally rock the streets and it's a spectacle. Although not a huge fan, I must say I really enjoyed Jason Mraz's performance of "Live High". Check it out, listen and enjoy.

Wednesday, January 13, 2010

Taste: Kogi's taking a left turn - look out!

If you haven't had a Kogi taco before, then you've certainly heard of it. If neither applies to you, then you've probably been living under a rock. Kogi, the highly-proclaimed food truck that took the novelty of "food trucks" to a whole new level and made it hip, has amassed tens of thousands of Twitter followers tracking down their lunch & dinner destinations for the day. Essentially, Kogi has been able to blend the food-service industry with cutting-edge Web 2.0 technology beautifully to really modernize how we eat. Personally, I don't follow Kogi on Twitter (sorry Kogi), but rather, stumble upon it randomly at times. I won't wait in line if it's ridiculously long (which it usually is), but I guess the handful of times when I've had it the food gods were just on my side. Nonetheless, it's great Mexican-Korean fusion food that you must try at least once if your visiting or live in L.A.

Anyways, I stumbled upon this article on WSJ.com and thought I'd share it with you. Kogi is taking a left turn and going from food trucks to the traditional Brick and Mortar (B&M) establishment. There's no hard open date set, nor a name for the restaurant, but it's not going to have the name "Kogi" in it. It'll be interesting to see whether or not patrons will embrace it as they have with Kogi, given that "Kogi" is a known brand name. Seemingly they'll still operate the 4 Kogi trucks which have brought them the success thus far, and in my opinion, certainly should. The cool thing is that Kogi's added a 5th car, which Scion custom-made for them, fully stocked with a grill, sink and fridge. Oh, and Scion footed the bill for it. Check it out - pretty cool.

Tuesday, January 12, 2010

Tinker: Make an iPhone App? No Problem

You've read about it before - a guy develops an iPhone game called Trism in his spare time, sells it through the App Store and banks $250,000. I don't know about you, but I've spent countless hours trying to come up with an iPhone app. Believe it or not, I have a legitimate list, too, though not long by any means. In the end, it's always come down to 2 things: who the hell will develop this and how much will it cost me?

There's a great source out there now that allows you to achieve this. It's really cool and it's called AppMakr. As long as you have your idea and website content, a few graphic files and $199, you'll be quickly on your techie way in having your own iPhone app that can be sold through iTunes. Have your own iPhone App AND make some dough? Way too cool.